5 Pilates Exercises for People with Multiple Sclerosis
Pilates Collective Denver is one of the few studios in the area offering Pilates for Multiple Sclerosis (MS) classes. Studio Owner and Founder Clara Gelatt was inspired to start this unique offering after seeing how much Pilates benefited her husband, who is living with a similar neurological disorder. What began as a short-term partnership with the MS Society has grown into a weekly class and supportive community. The clients who attend vary in their symptoms and mobility limitations, but regardless of how MS affects (or doesn’t affect) their lives , they’re all committed to using Pilates as a means of staying active and keeping symptoms at bay.
Our Pilates for Multiple Sclerosis classes provide safe, effective exercise for those living with neurological disorders. Plus they’re great for seniors without neurological symptoms as well. In addition to our Friday Pilates for MS class, several clients with Multiple Sclerosis attend Gentle Pilates, offered 6 days a week at our South location and on Fridays at our Broadway studio.
Since Clara has relocated to be closer to family, Ann Daxberger has taken over teaching Pilates for MS and the wonderful clients who attend. We asked Ann and Clara for their recommendations on accessible exercises for people with Multiple Sclerosis when they can’t make it into the studio (such as during an epic Colorado snow storm or when traveling). Here are the top 5 exercises they recommended.
Before you dig in, gather your supplies. Here’s what you’ll need:
Chair: Any chair where your feet can stay planted on the ground will do. (You can adapt most Pilates exercises to be done seated—this is great practice for seeing how accessible Pilates can be!)
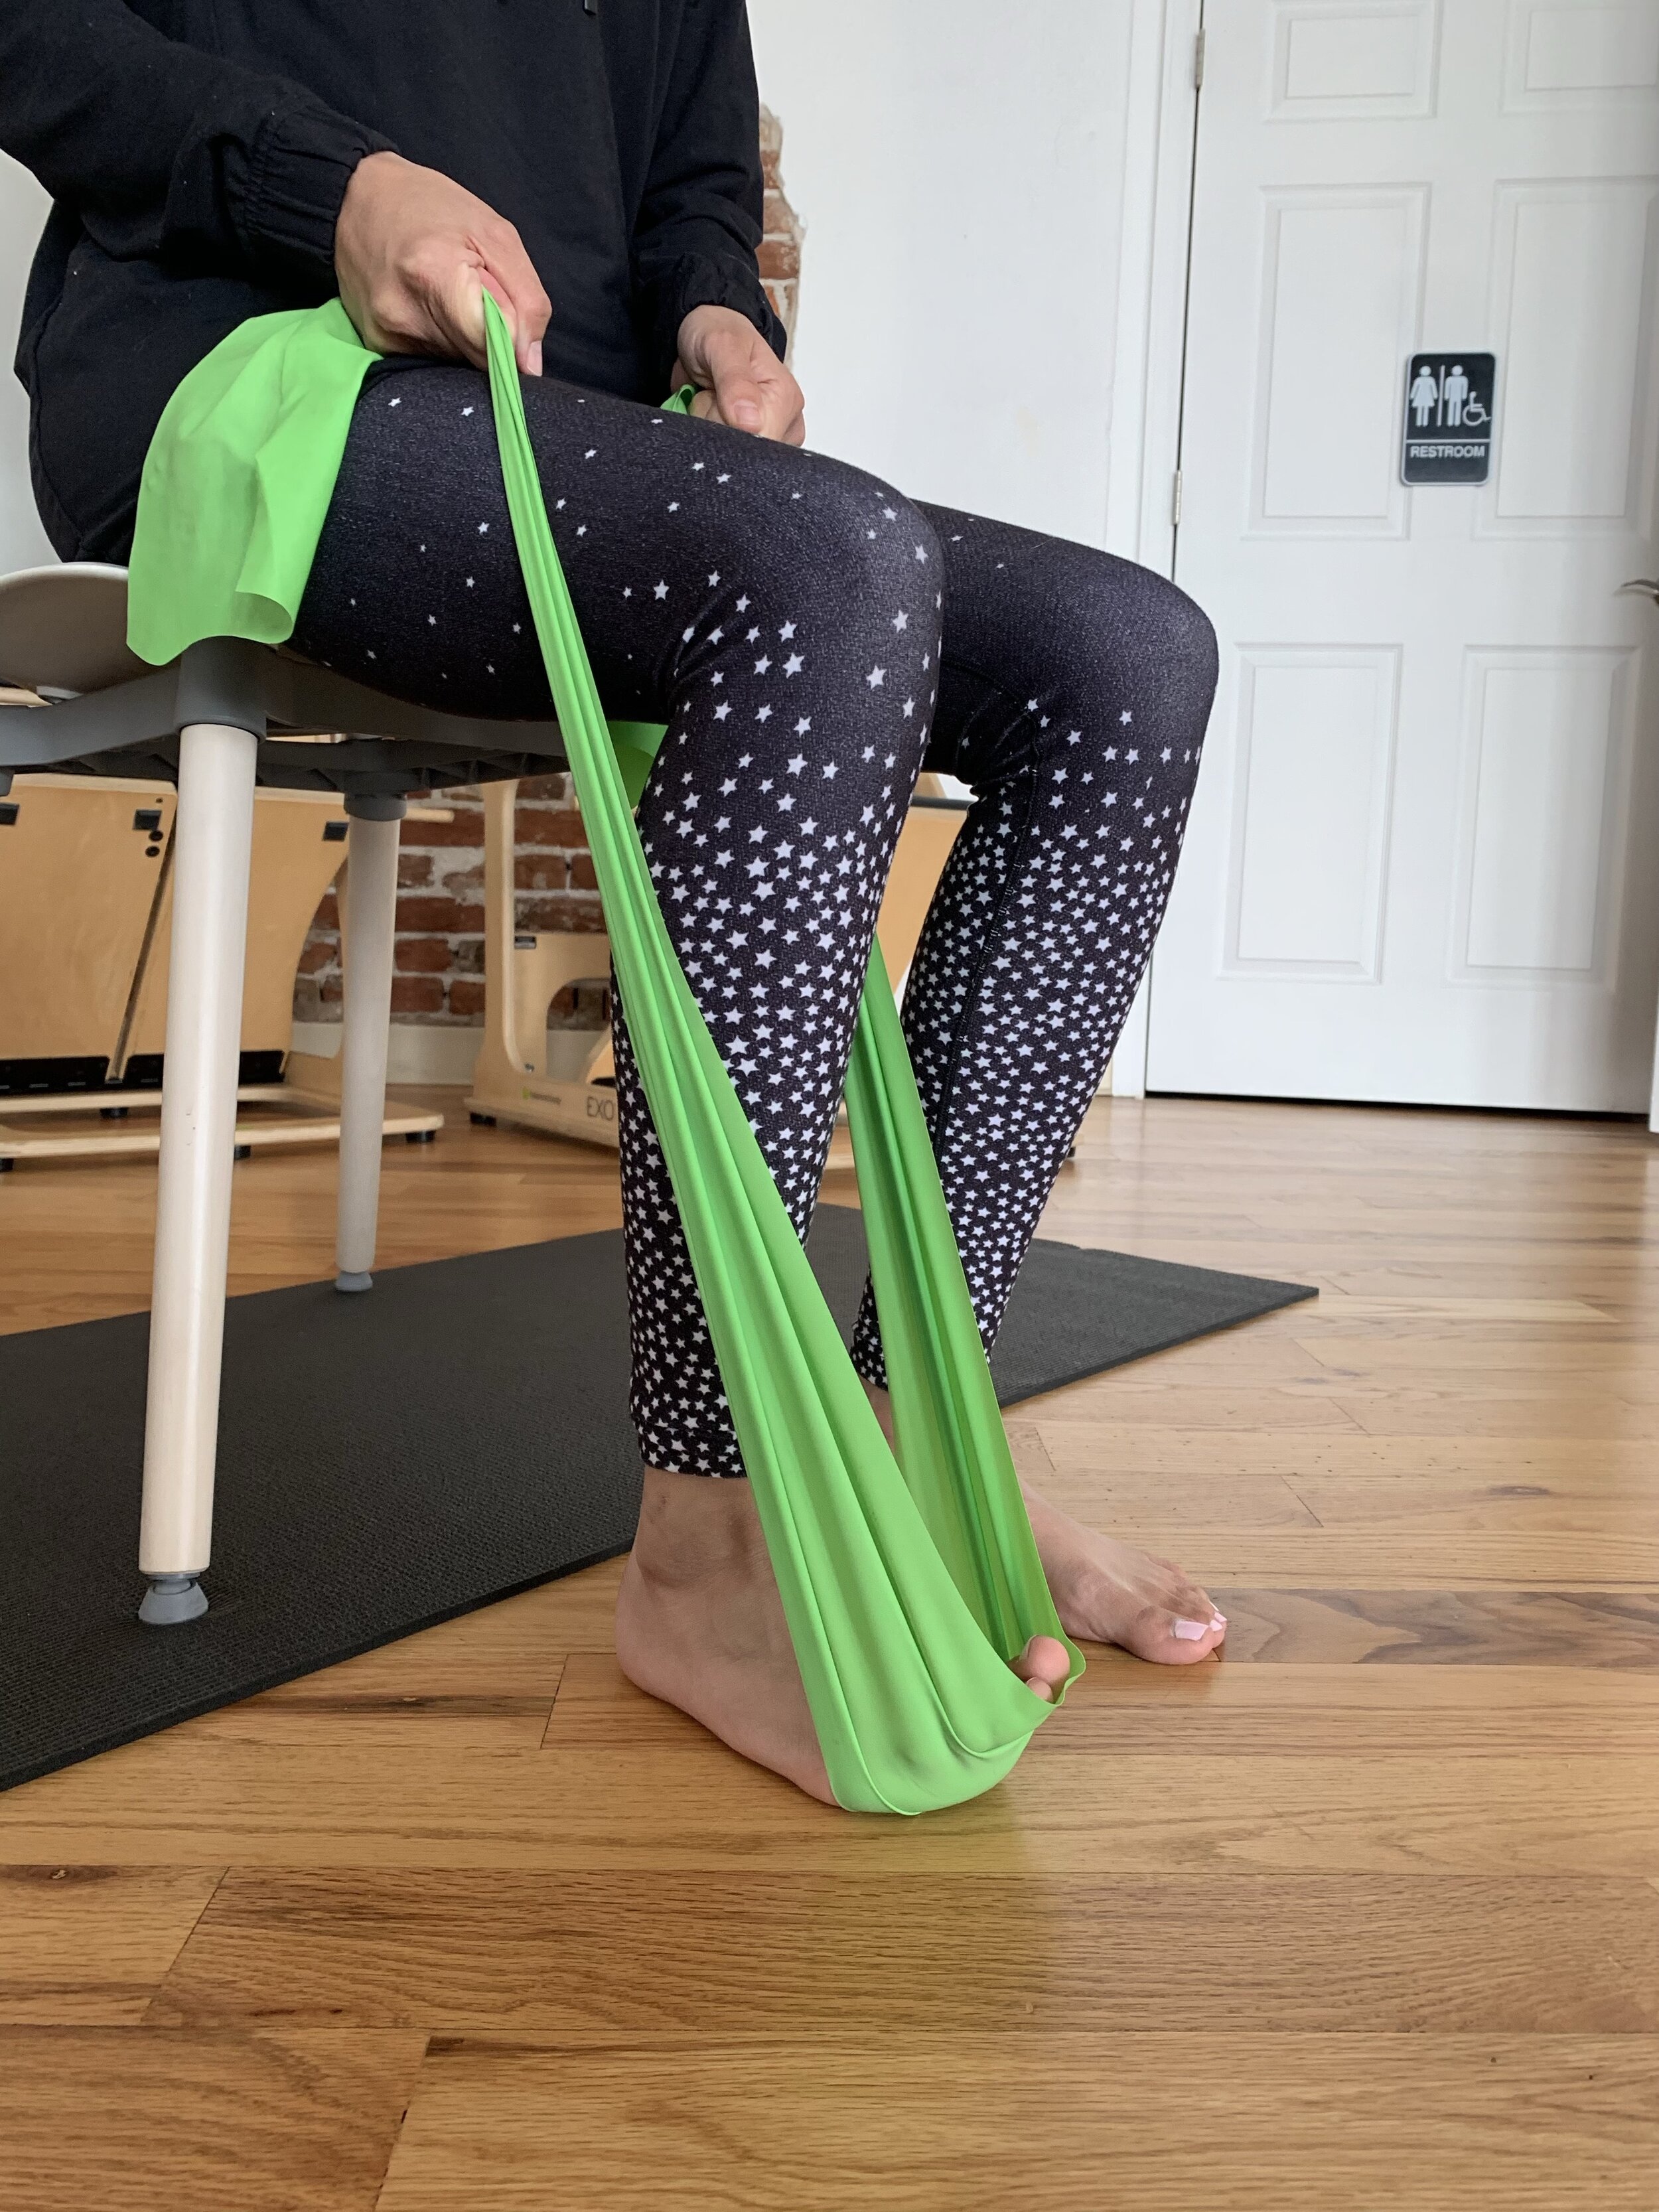
Thera band or scarf: If you’re dealing with drop foot, this will help you with our first exercise.
Foot roller: Roll up a washcloth if you don’t have a foot roller (we sell them at the studio if you want to buy your own).
Mat: If you don’t have a mat, put down a towel to lay on. Be sure to position furniture close by to help you get on and off the floor if you need it.
Wall or walker: Our last two exercises are standing. You can either have a hand on a wall for support or use your walker, whatever makes you feel most stable.
1) Seated Toe Lifts
We’ll start off with Seated Toe Lifts to get the muscles of the feet and lower legs moving.
Sit in your chair with your feet flat on the floor. Find tall alignment through your spine, thinking about the crown of your head reaching up towards the ceiling and your tailbone pointing behind you ever so slightly. Drop your shoulders away from your ears and lift your collarbones.
Position your feet hip’s width apart with all 10 toes down on the floor. On an inhale, keep your heels weighted down and lift your toes off the floor. As you lift, spread them apart, creating as much space between the toes as possible. Hold your toes up for a moment, then exhale and lower them back down.
If you are dealing with drop foot, wrap the thera band or scarf around the ball of your foot and pull upwards to mimic the motion.
You can either work both feet at the same time or one foot then the other. Either way, do 10 sets on each foot.
2) Foot Scrunches
While you’re seated and thinking about your feet, we’ll do some Foot Scrunches. We like to use foot rollers at the studio (we sell them if you want to pick one up), but you can also roll up a washcloth and use that. You’ll get the same benefit.
Before you start, check in with your alignment. See if you can pull your navel into your spine and sit up a little taller. Roll your shoulders a few times to encourage them down away from your ears.
We’ll work one foot at a time for this one. Place the roller or washcloth underneath one foot, between the ball and the toes. Scrunch your toes like you’re trying to pick it up off the floor, then release back down and relax the muscles of your foot. Do 5, switch to the other side, then repeat both sides.
The small muscles and bones of the feet can be hard to articulate, especially if you’ve had nerve damage in that area. That’s why we recommend doing a few, switching sides, then coming back and trying again: these muscles get fatigued easily and may need a break. (If this movement felt great on your feet and you want more, check out this post!)
3) Leg Lifts
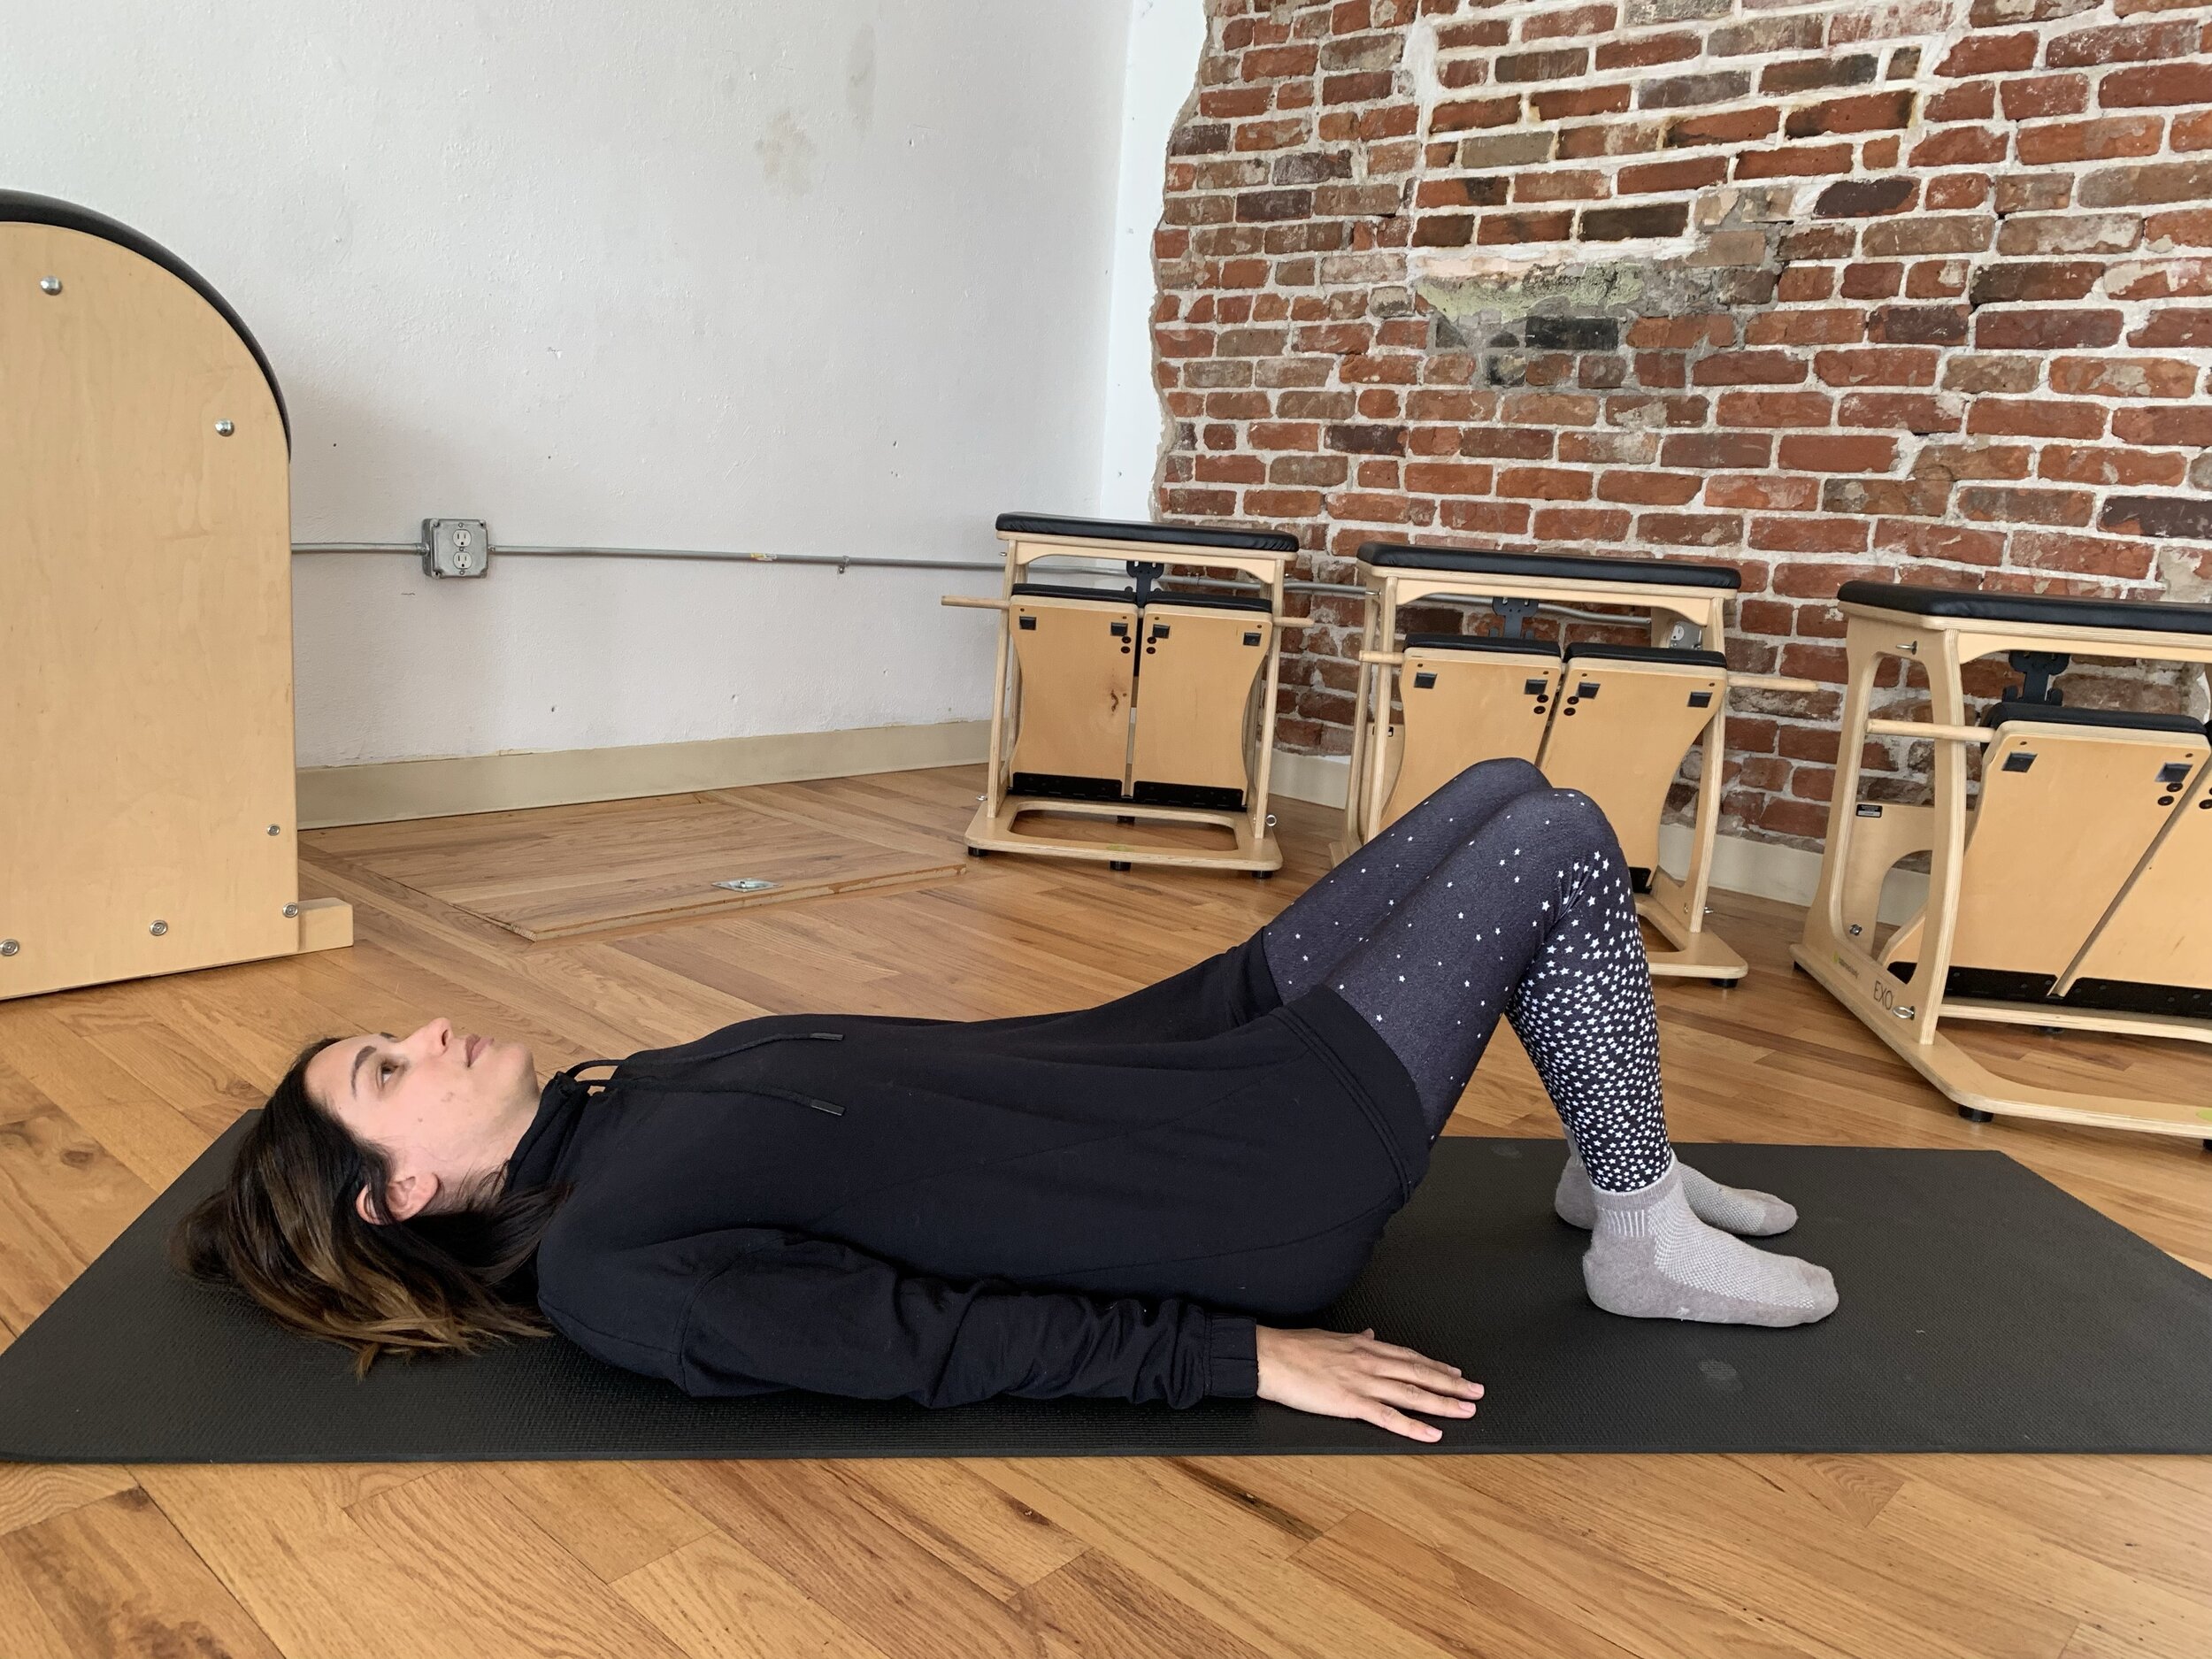
Next we’ll lay your mat and towel on the ground to do some Leg Lifts. Safely lower yourself onto your back with your knees bent and your feet flat on the floor. Relax your arms down by your sides, grab the sides of your mat for stability, or lay your hands on your belly so you can feel it working.
Take a deep inhale. On your exhale, lift one leg up into tabletop. Inhale to lower it back down, then switch legs. As you go, focus on the stabilizing leg, the one that stays down on the floor. Press the big toe of that foot down and feel the inner thighs engage to keep you steady as the other leg floats up light as a feather. Do 10 sets total, taking breaks when you need them.
4) Step & Lean
For our last two exercises—the Step & Lean and the Step, Lean, & Look—you’ll want to come up to standing with something supportive nearby. You can either put one hand on the wall or hold onto your walker out in front of you.
We’ll cue this as if your hand is on the wall. If you’re using your walker, ignore the cues about switching sides.
Stand with your right side towards the wall and your right hand against it. Find a tall, long spine with both shoulders away from your ears. Press your right hand against the wall to feel your stability and gently draw your navel into your spine to engage the abdominals. Keep both knees bent slightly, take an inhale, then step your left foot forward just a few inches. As you do so, keep the heel of your right foot anchored to the floor. On an exhale, push off your left foot to bring it back to center. Your right foot shouldn’t move at all during the entire movement.
Do the same thing with the other leg, this time keeping your left foot anchored as you step your right foot forward and back. Do 5 sets, turn and face the other direction so your left hand is pressed against the wall. Do 5 sets here.
This exercise is deceptively simple! It essentially breaks down the action of walking into slow motion. In doing so, it forces you to find your balance shifting from one foot to both feet and back to one. If you’re rehabbing from an injury or trying to wean yourself off your walker, this is a great exercise to practice daily.
5) Step, Lean, & Look
We’ll build on the Step & Lean by adding a look. Turn so your right hand is pressed against the wall and stand nice and tall with your shoulders over your hips. Keep your right foot anchored as you step your left foot forward. Keep both feet steady and look over your left shoulder for 8 counts. Return your gaze to center, then look over your right shoulder for 8 counts. Return to center and bring your left foot back to meet your right. Repeat stepping your right leg forward.
Do 2 sets, then switch so your left hand is against the wall and do 2 more sets.
Balance becomes even more of a challenge with the addition of the look in this exercise. To build strength and stability, think about pressing your big toes into the floor and feeling the inner thighs engage. Your legs are stable, like they have roots that extend into the earth, so your upper body can relax and your head can turn with ease.
If you have questions about these or any other Pilates movements for neurological disorders, please reach out. Our Pilates for MS class is on Fridays at 12:30pm at our South location on Colorado Blvd. We have a few handicapped parking spaces available and do our best to ensure you have a space in the lot if those are taken. See you then!


